Showing posts with label Beginners Guide. Show all posts

Saturday, 6 February 2016

Tagged under:

4 Social Media Infographics to Rule the Social World

Social Media is a jungle where only the fittest survive. It takes a lot of time for a relative newcomer to break through – most pundits preach patience, but there are few things you can do to stand up and get noticed.
Here are 4 awesome infographics to conquer social media. We have got you covered on Twitter, StumbleUpon, influencer marketing, social media image sizes and tips for all major networks.

Twitter Stats – Infographic

The 140 character limit Tweety bird is often where influencers hangout. I love Pinterest, StumbleUpon & Twitter hands down compared to any other social media network.
When I first started blogging, I had to decide which social platforms to target and Twitter was on the chopping list; not the shopping list. I am glad I started to use Twitter as I have a bigger following in Twitter than any other social platform.
You don’t have to just take my word for it; here are some twitter stats in an infographic that are mind boggling and easy to consume.
twitter-statistics-image
 Infographic credit: YourEscapeFrom9to5.com

StumbleUpon – Infographic

StumbleUpon like any social site can crash a web site with its potential to bring in viral traffic.
The biggest difference between StumbleUpon (SU) and the best social media networks – Facebook and Twitter is SU sends traffic direct to your site. StumbleUpon opens your site within the SU interface; there is no praying and hoping users will see your updates unlike in FB and Twitter. We are referring to organic stumbles which are free. SU also has a paid promotion and stumbles.
StumbleUpon shows users random web pages based on a user’s preference and their StumbleUpon history. Users then either ‘Up-Vote’ or ‘Down-Vote’ a web page. The more users that like your page the more free traffic you will get.
Beware the StumbleUpon story is not a fairy tale; SU does have some chinks in its armour. For example, SU is associated with higher bounce rate and lower conversions.  There are some tricks like using engaging images before scrolling and a catchy title which can help. This infographic can help you get the best out of StumbleUpon.
stumbleupon-image
Infographic credit: YourEscapeFrom9to5.com

Influencer Marketing – Infographic

If you take one infographic away from this post, then let it be this one. To really crank up your presence in social media, tap on an influencer who can help amplify your reach. Don’t go to an influencer with any average content; they will ignore you forever – first impressions count, especially in the digital world. Create an “UMPH” content then tap on an influencer or two.
Influencer marketing is about leveraging the influencer’s social following, marketing credentials, brand name and recognition. Bottom line influencer marketing saves you a bucket load of time. Here is an awesome infographic from eBrandz that takes you further on this topic.
influence-marketing-image

Social Media Image Sizes and Sharing Tips – Infographic

Social networks like Facebook, Twitter, YouTube, Pinterest and Instagram all have different image sizing requirements; they also have a set of tools you can use to best leverage them.
Do you want social media tips specific to a network?
What about some headline writing tips?
What are the best days and times to post on the various networks?
(P.S. – I am not a big fan of timing social updates I let Buffer handle that based on engagement)
I hear you saying, ‘YES’ please.
Don’t worry hear is an infographic to really ignite social media marketing and take it to the next level in 2016.
social-media-cheat-sheet-image
Infographic credit: onblastblog.com

Wrapping up

You can get all sorts of useful information about social media online. In fact, you can get overloading information that will drain you out. Take action and create a plan. Target a few social sites, you can bite your teeth into for starters. (Remember, to research which social platforms are used by your target audience.) You can’t be the king or queen of all the land. Be very careful of what you post in social media. If you are only posting about your product, services and content then slowly you will lose social engagement. Share awesome content from industry experts and try to build relationships in the social web including that of influencers. Good luck with your next social media campaign.

Saturday, 25 July 2015

Tagged under:

How to Add a PayPal Donate Button in Blogger

How to Add a PayPal Donate Button in Blogger
Are you charitable organization, are you looking to add al Donate button on your Blogger site? Then PayPal makes it a lot easier to accept donations on your blogger website. With PayPal donate button, there are a lot of possibilities as it comes with features that are helpful for any kind of organization looking for donations. Today in this article, we will show you how to add a PayPal donate button in Blogger.

Many non-profitable websites or even bloggers tends to add a donate button on to their websites to cover up the cost for running the website. Even sites like Wikipedia ask for donations to run. If you want to add a PayPal Donate button in your blogger site then follow the below instructions:

How to Add PayPal Donate button in Blogger:

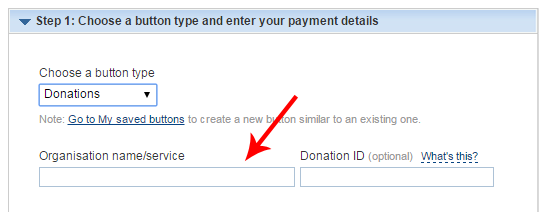
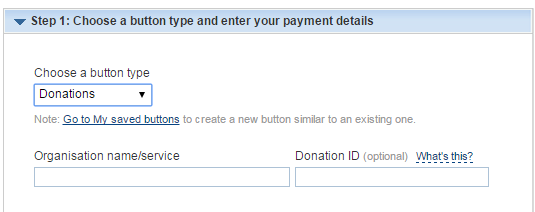
The very first thing you need to do is to login into your PayPal account, now go to PayPal button creation page and select “Donations” from “choose a type” dropdown list as seen in the screenshot below.
How to Add a PayPal Donate Button in Blogger

In organization field, fill your website name or the purpose of the donation but don’t be too descriptive.
How to Add a PayPal Donate Button in Blogger

You can also add a donation ID to track the donations but you can leave it blank it will be filled automatically by the system.

You can customize the text of the donation button or can dig in to choose from the various size of donate button. If you want you can replace the PayPal donate button with your own, such as featuring “Your organization’s logo”.  You can do all this by accessing “Customize text or appearance” link.


How to Add a PayPal Donate Button in Blogger

Once everything is finalized press “Create button” and it will provide you with the code that you’ll be using on your website.

How to Add a PayPal Donate Button in Blogger

You can also change the currency which you want to receive from the donor. People can donate in any currency but you will receive the donation in your described currency through the present exchange rates.

How to Add a PayPal Donate Button in Blogger

For contribution amount”, you can either set a fix donate rate or can give free-hand to the donors to set their own amount of donation.  We would recommend letting user choose whatever amount they want to donate gives you more chances of getting a donation.


By default all your donation goes to your PayPal merchant ID it is more secure and better way of getting donations. However, you can also select your primary PayPal Email address to get the donations.

How to Add a PayPal Donate Button in Blogger

Now copy the whole code of your button, you can also view its preview besides it. Press “Select code” to copy the whole code in just one click.

How to Add a PayPal Donate Button in Blogger


Now go to Blogger >> Layout >> Add a Gadget >> Add HTML/JavaScript >> Paste the button code in the HTML text area and press “Save Button”.
Tagged under:

How to Add Border on Image in Blogger


How to Add Border on Image in Blogger

Are you looking to add border to your images in Blogger? Sometimes adding border to images can make them standout in your content. Recently, one of our users asked us how to add border around an images in blogger. Though, it is very simple and can be done easily but new bloggers find it difficult. In this article, we will show you how to add border around an image in blogger.

To add border around images you need to write simple codes of CSS. With these codes you can easily add different kinds of borders having any colors that you want.

The very first thing you need to do is to login to Blogger.com >> Template >> Edit HTML >> Search for the b:skin>> tag. After finding the skin tag, just above it paste the following code:

.post img {border:5px solid #d2d2d2;padding:2px;}

In the above code you can change the #d2d2d2 with any other hex color to alter the color of your border. You can also increase the above 2px to a higher number to increase the blank space arround the border.

Furthermore you can also use different types of borders in your images, following are some border types that you can use:
solid: Defines a solid border
dotted: Defines a dotted border
dashed: Defines a dashed border
double: Defines two borders. The width of the two borders are the same as the border-width value
groove: Defines a 3D grooved border. The effect depends on the border-color value
ridge: Defines a 3D ridged border. The effect depends on the border-color value
inset: Defines a 3D inset border. The effect depends on the border-color value
outset: Defines a 3D outset border. The effect depends on the border-color value
Once you are done customizing your image border, press the "Save Template" button present at the very top of your screen.

We hope this tutorial may have helped you in learning how to add border around an image in blogger. Though the technique is very simple but still for beginners it might be a very tough task. However, share your thoughts below and also share it on Facebook, Google+ or Twitter.

Monday, 20 July 2015

Tagged under:

12 Things to Do Before Applying for Google Adsense

12 Things to Do Before Applying for Google Adsense

I know you want to make some good money with Google AdSense right? 😉

But it’s not easy to get into AdSense program now-a-days. You have to follow few things before applying for AdSense.

But it’s not easy to get into AdSense program now-a-days. You have to follow few things before applying for AdSense.

You must be thinking that…

How to apply for AdSense

How to qualify for AdSense

Am I eligible to apply for AdSense

What are Google AdSense Requirements

Why Google AdSense rejected my applicaton


This post is going to answer all your questions. It’s going be a bit long so grab a cup of coffee.. 😉

What is Google AdSense and Why You Should Use?

Google AdSense is one of the oldest network to offer ad publishing and works at Pay Per Click system. In fact Google used to give AdSense to everyone who used to make blogs through Google Blogspot.

When it comes to the legitimacy of Google AdSense, it speaks for itself. Google AdSense have thousands and thousands of satisfied customers and publishers. AdSense pays on time, every time.

One more reason for choosing Google AdSense is that we can earn huge amounts of money if we do our work in right way. There are many bloggers who are making a complete living from their blogs and Google AdSense. Therefore, Google AdSense should be the number one choice among all the other available networks.


It’s paying rates are better than all of other networks which is the biggest reason it is so popular to all Bloggers and Webmasters. But since everybody is running behind them, they have made the approval system very strict. You make little mistakes and get disapproved every time. Here are few reasons why Google will reject your application.

Why AdSense Will Reject Your Application?

Here are the most common reasons and AdSense requirements which they gives when they reject your application.

1.  Insufficient content / Unacceptable site content — Your website do not have enough text on them for Google specialists to review.

Google gives a lot of value and attention to the content of the blog before accepting it. If the content is poorly written and have grammatical mistakes, Google will reject the blog right away.

Not only the content needs to be grammatically correct, it must be unique and has to provide value to the users and readers of the blog. So the number one reason is the poorly written content on your blog.

2. Page Type / Design of your blog — What will you do if you land a page with full bright yellow background with white text on it, having huge buttons all over the place? Yes you’ll click away.

Blogs which are poorly designed and are hard for the visitors to understand, get rejected by Google for AdSense. You MUST have a good design which comforts the eye and is beautiful in the look.

3. No Privacy Policy, About us or Contact Us page — There are some pages which you must have before applying to Google AdSense if you want to get accepted. These are About us, Privacy Policy and Contact Us pages. These pages give the impression that you are a professional and that you are working according to the Google polices.

4. Site does not comply with Google policies — No rich, unique and meaningful content, no organic traffic, pages with little to no original content or bad user experience through clear navigation and organization. Your website may be the one that drive traffic through illegal sources, site with excessive keywords or poor coded design are usually rejected.


So you need a complete guidance and list of thing that you need to do before applying for Google AdSense and supposing that you are ready.

12 Things to Do Before Applying for Google AdSense

1. Privacy Policy :

One of the common mistakes that every bloggers and I made many times before getting approved. Even though there are people out there who say that having a privacy policy for a Blog doesn’t makes sense but they are wrong!

The first thing you will need to apply for Google AdSense and get approval is the privacy policy of your blog or website. If you don’t have it you cannot get approval simple is that. Why it is important? Because this privacy policy means you are not a scam and gives the sense of a serious business. Google will check the rest of the conditions only if you have this policy.


A privacy actually describes to your readers about what they will get on your Blog , what they should do and what they should not. So obviously there is nothing bad in having a privacy policy. While it can affect somehow on your AdSense Approval, you must give it a try. You can write it yourself or find Privacy Policy Generators online (You don’t need a lawyer anyway).

2. About Page:


Like privacy policy you must have a about page so that you can get approved. Like privacy policy this About page also give the sense of a serious business.

An About has major role and importance if you don’t want to apply for AdSense. But when it comes to AdSense, they are about zero chances of getting approved if you are not showing this page.About page simply describes about you and your Blog . This will not only help you establish a relationship with readers but it will also make them trust upon you.

3. Contact Us Page:

It’s quite obvious that everyone has his/her own opinion. What one of your readers likes may be bothering someone else. Than it is better to give them opportunity to speak up to you and tell how they feel about your Blog, what they want to be edited , what they liked or hated.

Create a contact us page, if possible add your professional email there like info@yourblog.com and your social profile links too. Bcreating this you are telling Google that see we care for our customers, visitors and we are ready to help them. They can contact us any time.

It will also show the Google AdSense Team that is viewing your site that you actually care about your readers and not only the money and AdSense.


I’d recommend you to check my contact page to get some idea.

4. Name/ Email Verification:

When you apply don’t forget to put your Name and Email address in some easily visible area like About Me and Contact Us pages. It will confirm to Google AdSense Team that it is the same person who applied for AdSense and not some spam, crappy bots. This will help the Google in the verification process.

5. Age Verification:

This is the mistake that most younger blogger are making who are less than 18. They write incorrect age and get into trouble.

Use your correct date of birth and age while applying for Google AdSense account.


Because Google AdSense is not for people who are under 18. Some people realize this problem after being disproved a few times without any legitimate reason. So I advise you to be accurate while typing your age. Be honest.

6. Minimum Number of Posts:

What should be the minimum number of posts before applying for Google AdSense? There is no confirmed answer.

Not even one.

Because I have seen very established Blogs with 400+ posts and their owner telling me that Google AdSense is rejecting them while somewhere bloggers with 40,50 posts are enjoying making money.


Exactly, what I said that there is no actual answer. However, we can always predict things. According to my experience, you should only apply after you have more than 50 posts. Posts length must be 500+ words too with quality content.

7. Design:

As mentioned earlier, you blog design matters a lot. It should be professional and not like a messy photo gallery. Clean, professional and smart design is appreciated by Google.


Your blog design is the biggest thing after Content. This represents your expertise, experience and professionalism. So be careful because anything can kill your chances of getting approved by AdSense. I recommend Elegant Themes because you get access to 87 WordPress themes in just $69.

8. Content Type:

Be careful with what type of content you are publishing. Because it is something that truly matters.

Google AdSense is not for pornographic, pirated content, illegal items, drugs or other blogs /sSites like that. AdSense team won’t be willing to allow you to step in if you own a Non English Blog. Having posts shorter than 200 words in length is also Red Signal.

9. Providing Value:

Google loves the blog who are providing value in their content and their visitors and customers are enjoying that value. Be sincere with your visitors don’t ever try to scam them instead provide value.

Don’t complain about not making money and don’t clearly state that you’re blogging for money only and have no other interest in it. Because this will show them that you will not be providing values to your readers any day. Hence another Red Light glows up.

10. Top Level Domain:

Those days are gone far away when AdSense used to approve “Blogspot” and “WordPress.com” Blogs. As for today, you must have your own unique domain that specifies your Blog. If you don’t have one yet, stop dreaming about getting approved with Sub domains and go buy a Top Level Domain.

When it comes to domain, your domain should be of top level. For this purpose the best domain is .com domain. Choose a short, unique and easy to remember domain related to your blog niche.

Another important thing about domain is it’s age. Because most of Asian Countries, AdSense has placed an age restriction. They don’t accept any sites which are not 6 months old.

So keep it in mind before applying for Google AdSense program.

11. Other Ad Networks:

If you have any other Ads placed like Chitika, Clicksor or anything, it’s time to drop them off.

Even Google AdSense allows you to use other Ad Networks along with them, it’s better to remove the ads before Applying and don’t put them back until you get a reply from AdSense Team.

So, before submitting your application for Google AdSense make sure to remove all the ads on your blog from any other network.

12. Paid Traffic:

Google hates the sites that are getting paid traffic and mostly penalizes them so there is not a damn chance of getting approved by AdSense for a site that is getting paid traffic. You can bring traffic from Search Engines or any other way you want but if you want to earn via Google AdSense the right way, paid traffic is not a solution.

Also note, that Google do not accept site which gets traffic from illegal sources. So focus on getting traffic from legal sources like social media, SEO and related blogs.

What to do if AdSense is not getting approved?

After all this what if Google AdSense does not approved you?

It’s not the end of the world! 😉

There are many other trusted and high paying ads network you can use and trust me they are not hard as Google AdSense is in terms of getting approval. One door of opportunity is closed so the other one will open.


You can use these ad networks to earn money without AdSense .They are easy to get approved.
Tagged under:

How To Fix Your Website When It Gets Hacked?

How To Fix Your Website When It Gets Hacked?


It's not uncommon for sites - even large ones with lots of protection - to get hacked. Security is a major problem these days. And if your site gets hacked, it can get damaged in a number of ways. You could lose all your data, or lose its ranking due to malicious activity. So while you can take periodic backups, you cannot prevent someone from hacking into your site. The best and most practical thing to do in such an event is to recover your site as fast as possible so that the effect of the attack is neutralized/minimized.

Here are some tips shared by Google for getting your website back on track after it has been hacked.

Clean up malicious scripts


Hackers can target your site for any number of motives. From taking down your website and deleting its content to simply adding backlinks discreetly, there's a lot that can be done. If you notice suspicious content appearing on your website, delete those unnecessary pages immediately. However, don't just stop there.

Hackers will often insert malicious scripts into your HTML and PHP files. These could automatically be creating rogue backlinks or even new pages. Make sure you check your website's source code and see for any malicious PHP or JavaScript code that could be creating such content.

Maintain your CMS


Websites often get hacked due to vulnerabilities in a CMS that get patched with updates. If you're running an older version, your site is more susceptible to attack. Make sure you keep your CMS updated, and use a strong password for login. If possible, enable two-step verification to secure the login process.

www vs. non-www


www and non-www URLs are not the same. http://www.example.com is not the same as http://example.com - the former refers to a sub-domain 'www', whereas the latter is the root of your site. When checking for malicious content, verify the non-www version of your site as hackers often try to hide content in folders that may be overlooked by the webmaster

Other useful security tips


Avoid using FTP when transferring files to your servers. FTP does not encrypt any traffic, including passwords. Instead, use SFTP, which will encrypt everything, including your password, as a protection against eavesdroppers examining network traffic.
Check the permissions on sensitive files like .htaccess. Your hosting provider may be able to assist you if you need help. The .htaccess file can be used to improve and protect your site, but it can also be used for malicious hacks if they are able to gain access to it.
Be vigilant and look for new and unfamiliar users in your administrative panel and any other place where there may be users that can modify your site.
Got any questions? Feel free to leave a new thread in our discussion forum. You can read the post from Google along with a couple case studies here. Good luck (:

Tagged under:

How to Create Short URLs For Your Blog Using Google Shortener

How to Create Short URLs For Your Blog Using Google Shortener

With the rise in the social media, we are continuously seeing people are giving more significance to branding. The branding starts from the Facebook Cover, personalized twitter background, but that’s not all. While sharing anything on their social profile most of the top companies always prefer small URLs instead of Long Tail URLs. For example, BuySellads uses “bsa.ly”. If your site is hosted at Blogger.com, then we have good news for you. To get a slim small URL for your content, there is no need to rely on a Third-party URL shorting services. Fortunately, Google provides a Free-to-use URL shorting service that does the job quite brilliantly. Therefore, today in this article, we will Show How to Create Short URLs for your Blogger.com Blog Posts?

Why to use the Google URL Shortener?


People often share lots of links online. With character limits in tweets, you do not get enough room to say what’s in your mind. In this situation, Small URLs provides you the room to express your thoughts within the same Status update or tweet. Following are the few perks of this service. 

Stability: One of the most reliable services with almost 100% uptime.
Speed: With high speed Google server, it loads URLS quicker than anyone service (in a few milliseconds).

Security: Sends warning and notifications if URL points to Malware or phishing or spam website.


Analytics: Not only tracks the number of Clicks on your link but also provide the geographical details or the user.

How to Create Short URLs with Google URL Shortener?


First go to http://goo.gl and Login into your Gmail Account, which will allow you to track the number of clicks that you are getting on a certain URL. Once done, proceed to the next step.

How to Create Short URLs For Your Blog Using Google Shortener

Now just enter the Post URL or any other URL in the address bar (input box) at the top of the page and press the “Shorten URL” button. On pressing the blue “Shorten URL” button, a new window will slide out, and it will provide you a short URL somewhat like goo.gl/QoSaR. Consider the following screenshot.

How to Create Short URLs For Your Blog Using Google Shortener

Your short URL is ready, and it can be used on any social platforms i.e. Twitter, Facebook, and etc. to test whether the URL is working well or not, copy that Small URL and paste it into the address bar of your browser and Hit enter. On pressing enter, you will notice that Short URL will automatically redirect you to the Long URL that you just shorten few moments a go.

How to Create Short URLs For Your Blog Using Google Shortener

Frequently Asked Questions:


How to Track Number of Clicks or Visits?
To track the number of visits, you first have to login into your Gmail account which you used while creating a small URL. After logging in, go to goo.gl and on the bottom of the page you will notice all the Long URLS which you shorten through Google URL Shortener. From the list, select any Long URL which you want to Track and Press “Details” to get access to the comprehensive tracking Report. It will not only Display the number of visitors but would also provide their other details i.e. Browser, Referring URL, country and operating system.

How many Short URLs I can Create?
You can generate unlimited Small URLs using Google URL Shortener service. There is no limitation in this free-to-use service. 

Tagged under:

Best Tips To Save Your Google Adsense Account From Getting Banned

Best Tips To Save Your Google Adsense Account From Getting Banned

Blogging is the most popular and the easiest way to earn some handsome revenue. Blogs are the source of knowledge. You can find tons and tons of blogs on even tiniest topics. If you owns a blog and you want to earn some revenue but you don’t know how to get started? Simple you are at the right place. Google Adsense is one of the biggest names among the pay per click programs. It means a Publisher will be paid only if some one clicked on the ads but never get over exited Google Adsense has very strict policies and Google did not hesitated to ban any account. Even some times they block your account without any reasoning so be careful and use your Adsence account purposefully and cleverly Remember: Once your Account is banned no new account will be issued on the same payee name.

The Instructions to Save Your Google Adsense Account From Facing Detention Getting Banned

1. Stop Clicking On Your Own Ads: The Silliest mistakes the publisher usually make is to click on there own ads. They thought that Google are not watching any thing They Say “Oh see I clicked on my ad and I do every day and Google is so busy that they are not even noticing” but when the earning reaches 25 to 90$ a sudden message arrives your account is banned due to invalid click activity. So keep in mind Google has a very powerful and strict system so doesn’t try to click on your own ads.

2.Don’t Reading And Understanding The Google Adsense TOS: During the creation of our Adsense account Google offer us to read there TOS (Teams Of Service) we usually neglect them thinking it is un important which is the biggest mistake we usually made. So it’s important to not even read it but to understand it first go here to read Google Adsense TOS

3.Asking Your Visitors To Click on Ads: This is another childish mistake we usually made asking our friends, family, even our visitors to click on Ads. Most of the publisher inserts a notice on the website begging their visitors to click on the ads. Some users even insert a arrow indicating towards Google Ads.

4.Using Advertising Program Similar To Google Adsense: If you think Google Adsense is the only program to earn revenue then you are wrong there are many other ways to earn from your blog. If you use many advertising programs on the same website then your Adsense account could face serious detention, in the form of getting banned so it’s important to use only those advertising program which Adsense supports Like Infolinks. You can use Infolinks with Google Adsense without any worry.

5.Creating Multiple Google Adsense Accounts: Usually publisher create many Adsence account under the same payee name. Creating multiple Adsence account on the same payee name is the Biggest violation of Google Adsense Tos.

So These Are the Important Tips you should follow to keep your Adsense account working. If you violate even a single rule you will face detention for sure don’t think Google is not seeing any thing Google is one of the biggest organization they are keeping eye on you every move so be careful and work honestly.

Sunday, 19 July 2015

Tagged under:

6 Better Ways to Get Facebook Likes Using Blogger Site

6 Better Ways to Get Facebook Likes Using Blogger Site

Are you looking for more Facebook Likes? In the past, we have shown you quite a few ways to get easy genuine Facebook Likes. However, what if I told you there are a few more simple ways to get quality Facebook Likes. Here, if you think this article will give some software generated paid like then you’re wrong this time. In this article, we will share 6 better ways to get Facebook Likes Using Blogger site.

Why you need More Facebook Likes?

Facebook is the only leading social networking website. likes to give you a chance to reach a bigger audience and helps you build a community on your website on social media. In reality, it takes a lot of time, patience, and status updates to attract audience. But if you’re really smart then you can always apply better marketing strategies.

6 Better Ways to Get Facebook Likes Using Blogger Site


1. Facebook Like Box Pop Up:

There are people who are using a non-friendly Lightbox pop ups which end up annoying users, rather than making them to like your page. Which is certainly not the right approach?

We recommend you to use Advance Facebook pop up like box that only appears once. It only appears again to the same user, if he clears his/her cookies and history.

2. Run Contests and Giveaways

Have you ever thought why there are so many giveaways and contests runs around on different Facebook Pages and websites? This is one of the most effective ways to attract real more likes without doing much.  Still, you do not need to give away expensive items, people will love to get anything that is for FREE.

In the past, we have already written a post on how to run giveaways on blogger site so do not forget to read that article.

3. Social Sharing Buttons:

Nowadays its must to have social sharing buttons on your site somewhere near your content. This allows your visitors to share your content to their most favorite social networking website.
However, keep in mind you only need to add those social sharing buttons that works not a huge cluster of different social buttons. Because it consumes more resources and cause slowness in your website.

We recommend floating social media bar, that is reliable and consist of only those social sharing buttons that works like Facebook, Twitter, and Google+.

4. Embed Like Boxes in Sidebar:

Another clean way to get more likes is to add a Facebook like box in your sidebar. You can make your like box stand out in the sidebar by adding headings just above it or you can give it a complete different touch if you are good at CSS.

You can also embed status posts in blogger that is also an effective way to mention your Facebook page.

5. Social Content Lockers:

This technique may cause annoyance, but it works. You use social content lockers to hide your content and only people who will either share or like your page can get access to it. We do not recommend you to use this on each and every post, use it smartly on a few posts.

6. Interlinking Facebook Page:

Another clean way is to ask your users to like your Facebook page by linking it with some keyword i.e. “Please like our Facebook page”. This technique is followed by a lot of major websites nowadays. This is a simple tip, but the majority of small business owner don’t use it. If you added the link to the right place, it would give your likes a great boost.

If you liked this article, then please share this content with your friends.
Tagged under:

19 Useful Keyboard Shortcuts for Blogger Post Editor

19 Useful Keyboard Shortcuts for Blogger Post Editor

Bloggers always look for new tricks and tweaks related to blogging and we keep on helping you in that by sharing some of the awesome tricks and tweaks of Bloggers. Keeping the same trend on, we are sharing some useful keyboard shortcuts which not only save your time but would make the job lot easier. These keyboard shortcuts will help you out in easing your work and you can perform different sort of task in seconds with the help of these keyboard shortcuts. In this article, we will show you 19 useful keyboard shortcuts for Blogger post editor.


So, here are the list of these awesome keyboard shortcuts which you can use on Blogger and ease out your work. We all know that keyboard shortcuts let us to perform different task without wasting much time and that is the reason we are sharing this list here for you in order to save your time. And, we all know that in blogging, “Time is Money”.


Shortcuts Function & How to Apply


  1. Ctrl + C It will copy the selected text. First select the text and then apply the shortcut.
  2. Ctrl + V It will paste the coped text.
  3. Ctrl + Z It will undo the deleted or erased text.
  4. Ctrl + Y It will redo the undo text.
  5. Ctrl + X It will redo the undo text.
  6. Crl + B It will bold the selected text. Select the text and then apply this shortcut.
  7. Crl + A It will select the complete page.
  8. Crl + S It will auto-save your post and you can keep on editing at the same time.
  9. Crl + U It will underline the selected text. First select the specific text and then use this shortcut.
  10. Crl + I It will italicize the selected text. First select the text and then use this shortcut.
  11. Crl + K It will insert hyperlink to selected text. First select the text and then insert the link into it.
  12. Tab It will change the bullets into sub-bullets.
  13. Tab + Shift It will add levels between bullets and levels, (Use to remove the bullets or numbers). First select the text and then use this shortcut.
  14. Ctrl + F It will give you a search which you can use to find any phrase oe sentence in your post.
  15. Ctrl + Shift + M It will convert your Blogger Post Editor to Mobile View.
  16. Ctrl ++ (Press + Twice) It will zoom in the blogger post editor.
  17. Ctrl -- (Press - Twice) It will zoom out the blogger post editor.
  18. Ctrl + 0 It will change the screen to default size.
  19. Ctrl+Shift+V It will paste the copied item without formatting.

So, this was the list of 19 useful keyboard Shortcuts for blogger post editor, we are sure that this would have been proven helpful for you guys. We have updated this list by including some of the new shortcuts and we personally have checked all these shortcuts before sharing them with you.

If you have any other shortcut to share which we have not included then share them in the comment box. Your share would be helpful for our readers out there.

If you liked this article, then please share this content with your friends.